
In this section, you will learn how to:
Customize your Workspace
Personalize the Subtitle Editor
Change the Appearance of Subtitles
Format Subtitle Lines
Watch this video to learn about customizing your subtitles and workspace, but if you prefer reading the instructions instead, keep scrolling down.
Customizing your Workspace
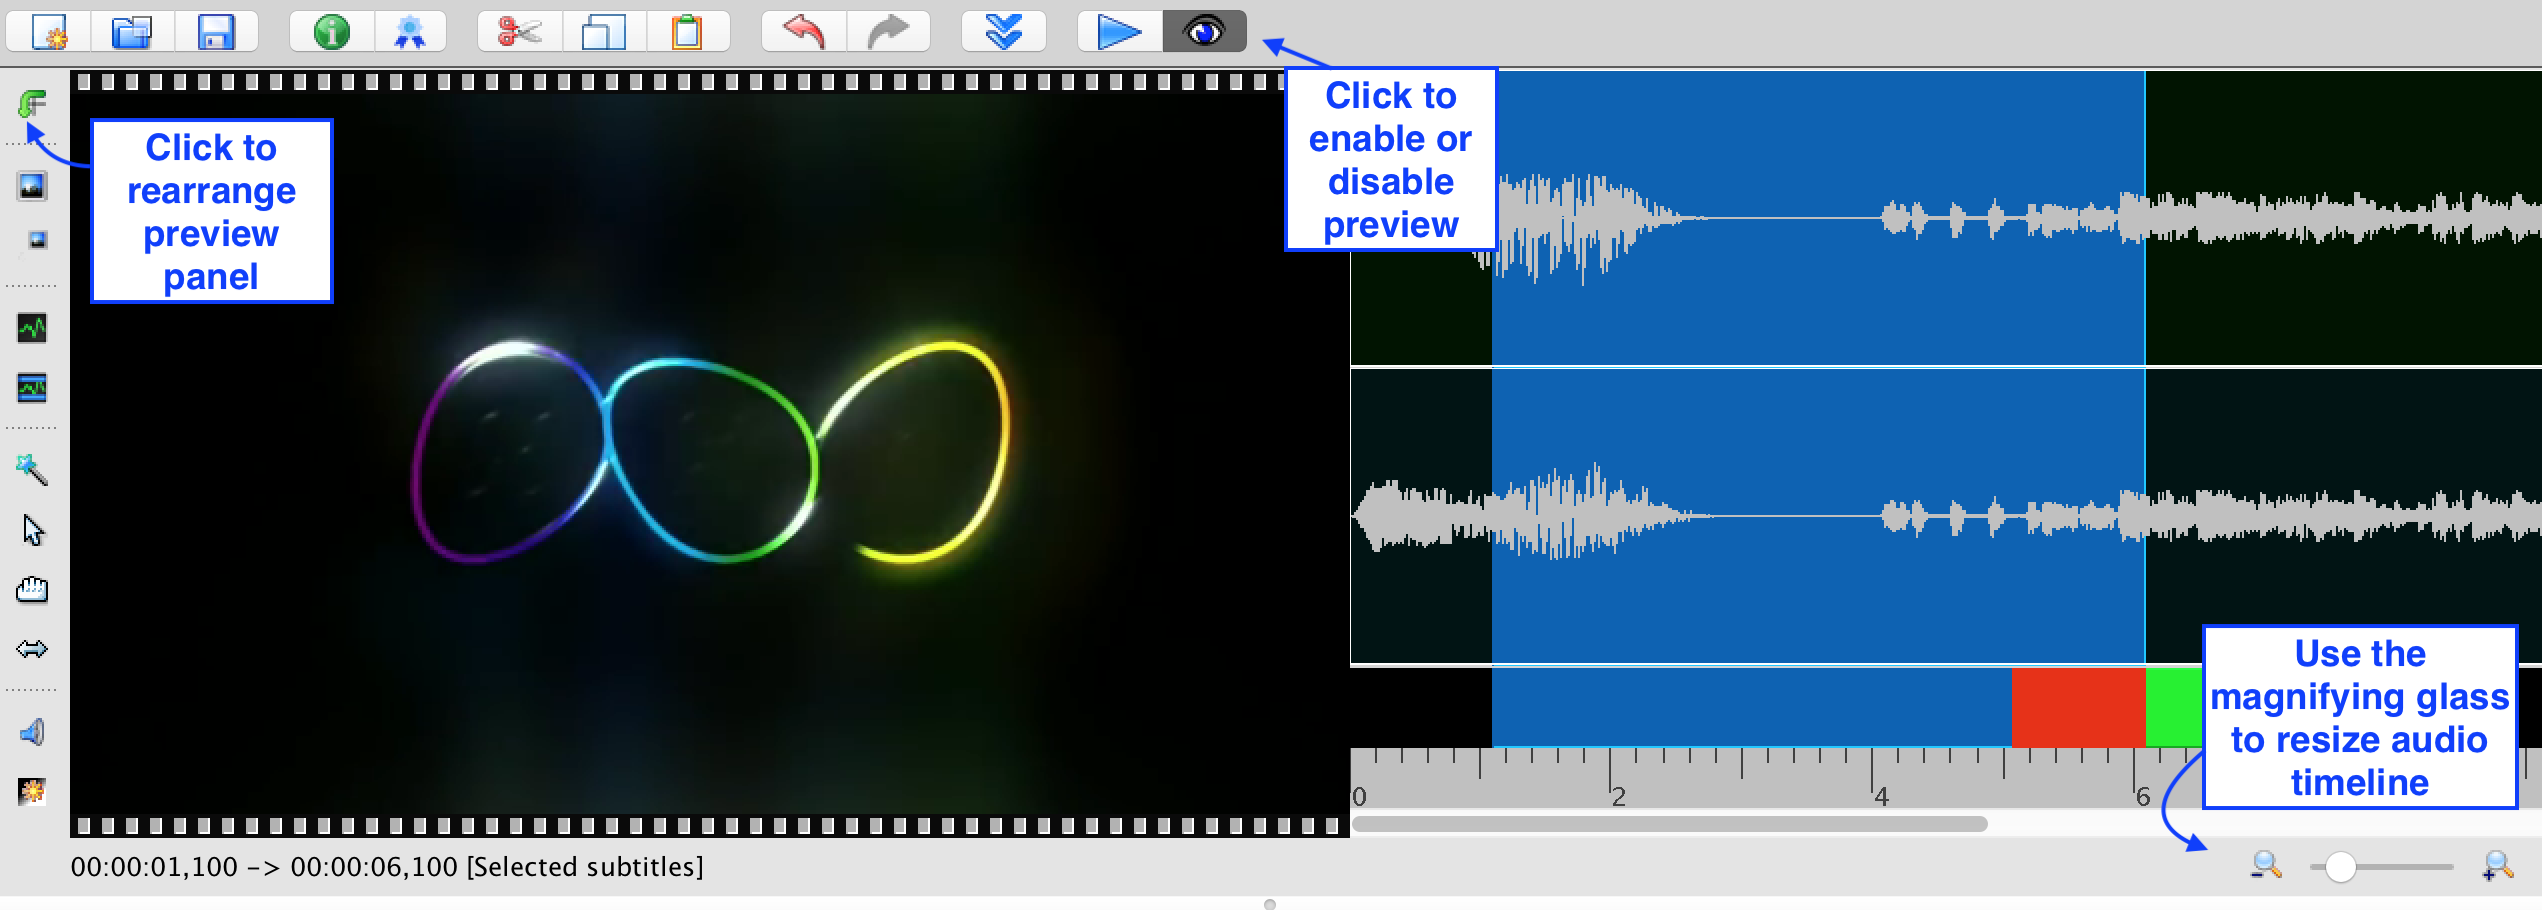
Rearranging the Preview Panel
To rearrange the preview panel, click the Change orientation of preview panel ![]() button on the left-hand side menu. This will place the previewing window and the audio bit side by side, instead of on top of each other.
button on the left-hand side menu. This will place the previewing window and the audio bit side by side, instead of on top of each other.
Enabling or Disabling the Preview
To enable or disable the preview, click the eye ![]() button. When the preview is disabled, the screen will only contain the subtitles without the video.
button. When the preview is disabled, the screen will only contain the subtitles without the video.
Magnifying the Audio Timeline
Drag the magnifying glass under the audio timeline to enlarge or decrease its size.
Personalizing the Subtitle Editor
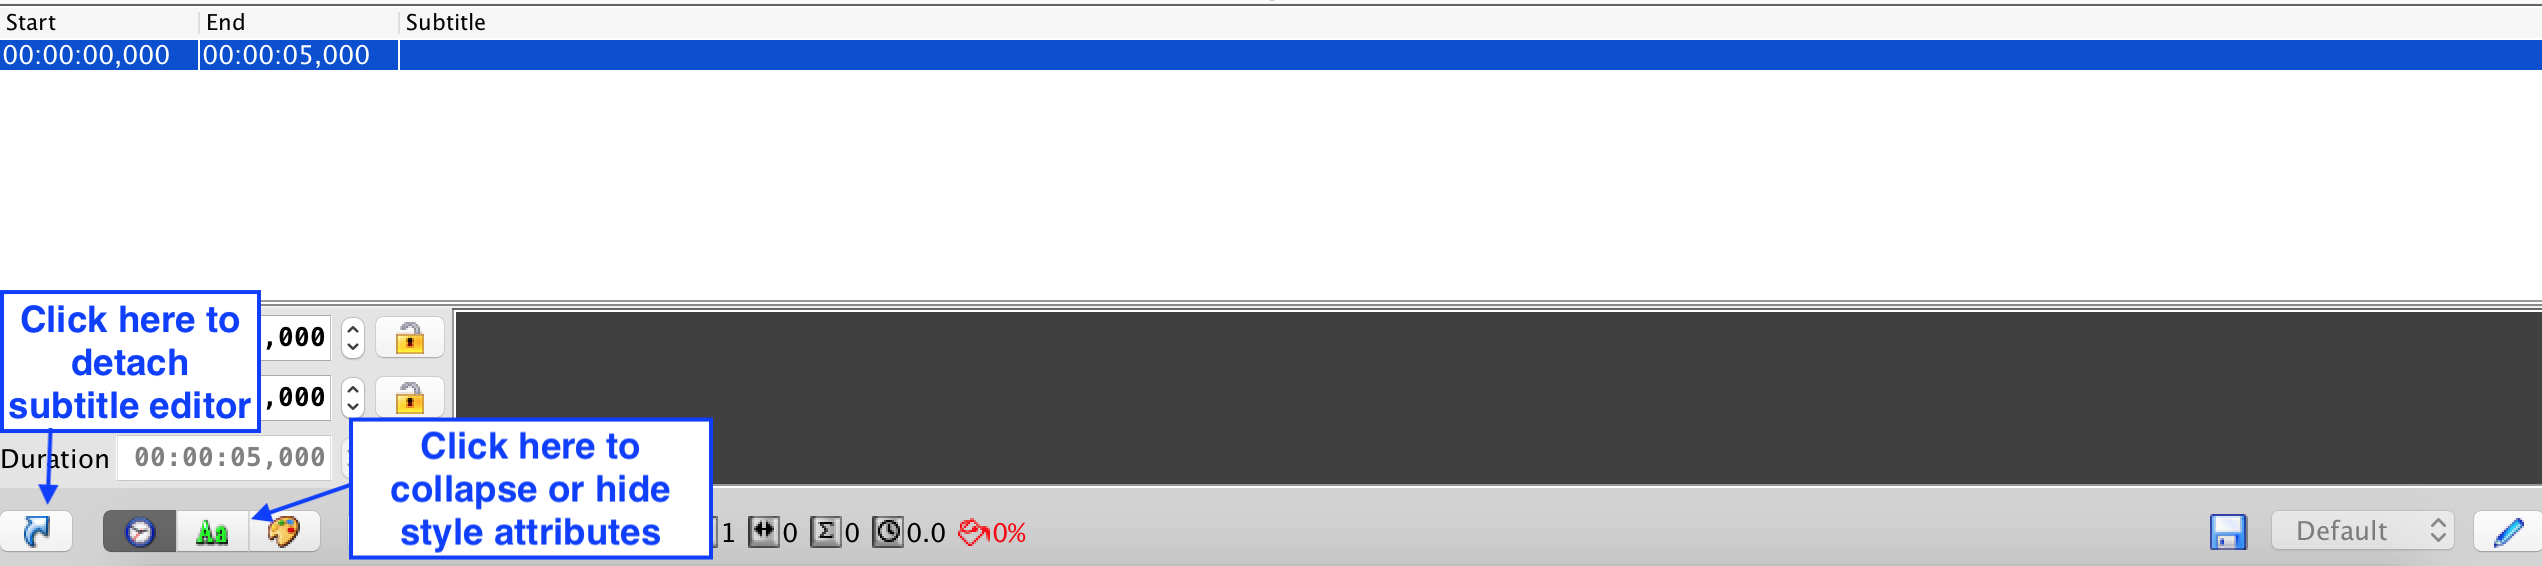
Detaching the Subtitle Editor
To detach the subtitle editor, click on the arrow ![]() button.
button.
Hiding and Displaying Subtitle Style Attributes
- To hide or display subtitle style attributes, click on the Aa
 button.
 - Once the subtitle editor is detached, you can move it around the page and position it to where you’d like. To reattach the editor, simply exit out of the editing window.
Changing the Appearance of Subtitles
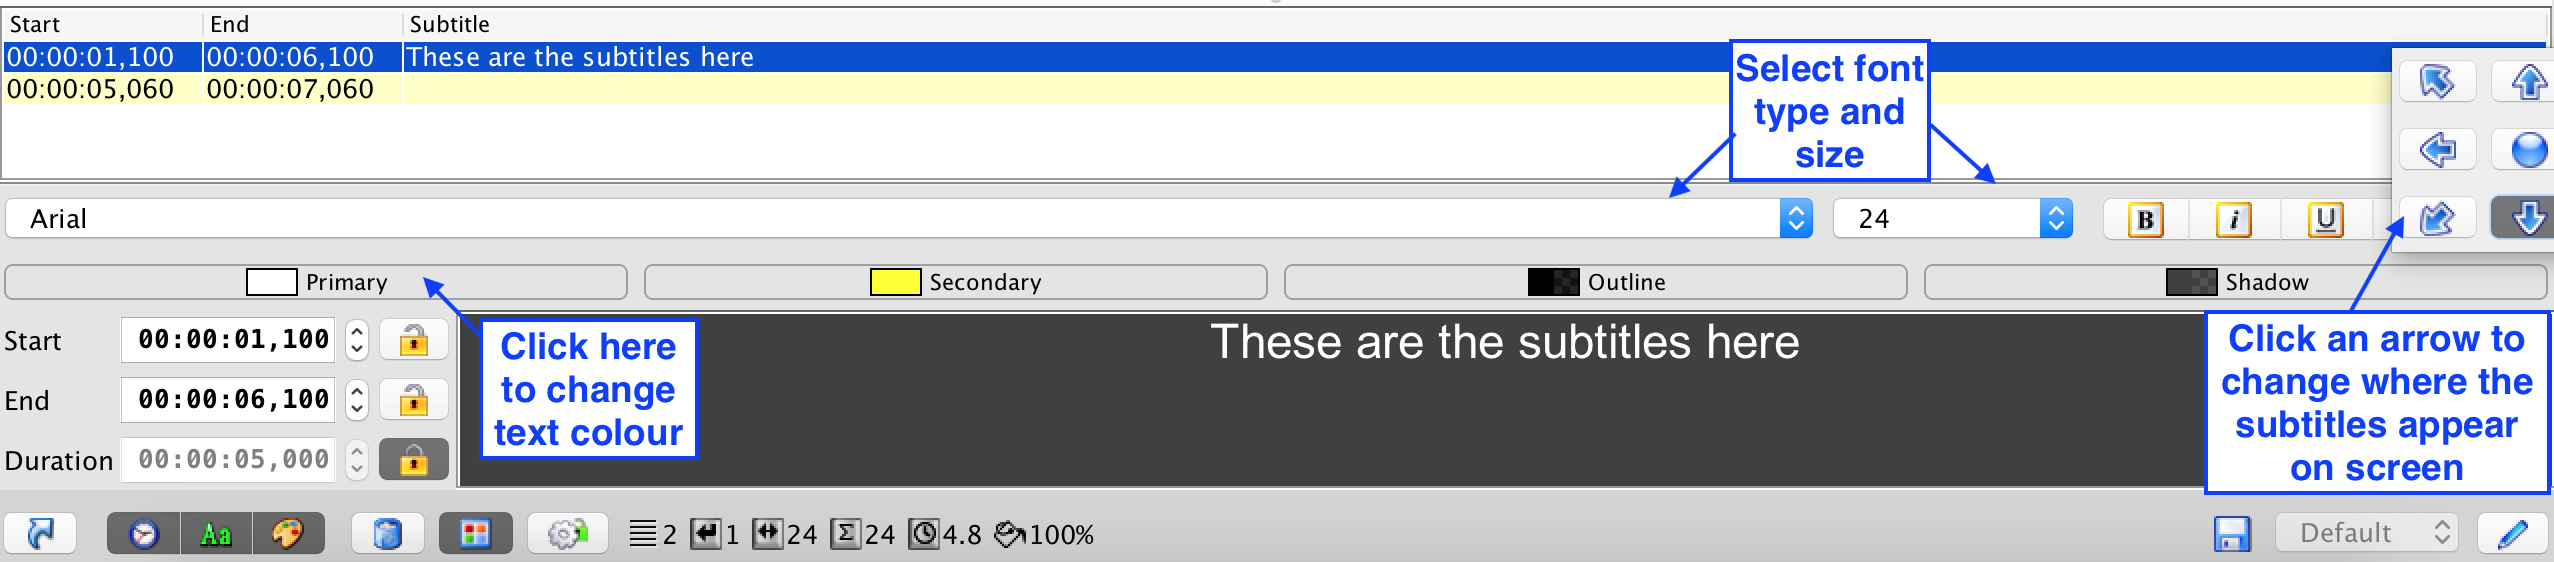
Changing the Style of a Single Subtitle Line
- Select a subtitle to edit.
- Click on the Aa
 button at the bottom of the subtitle editor. This will enable the subtitle style attributes.
Changing the Style of Multiple Subtitle Lines
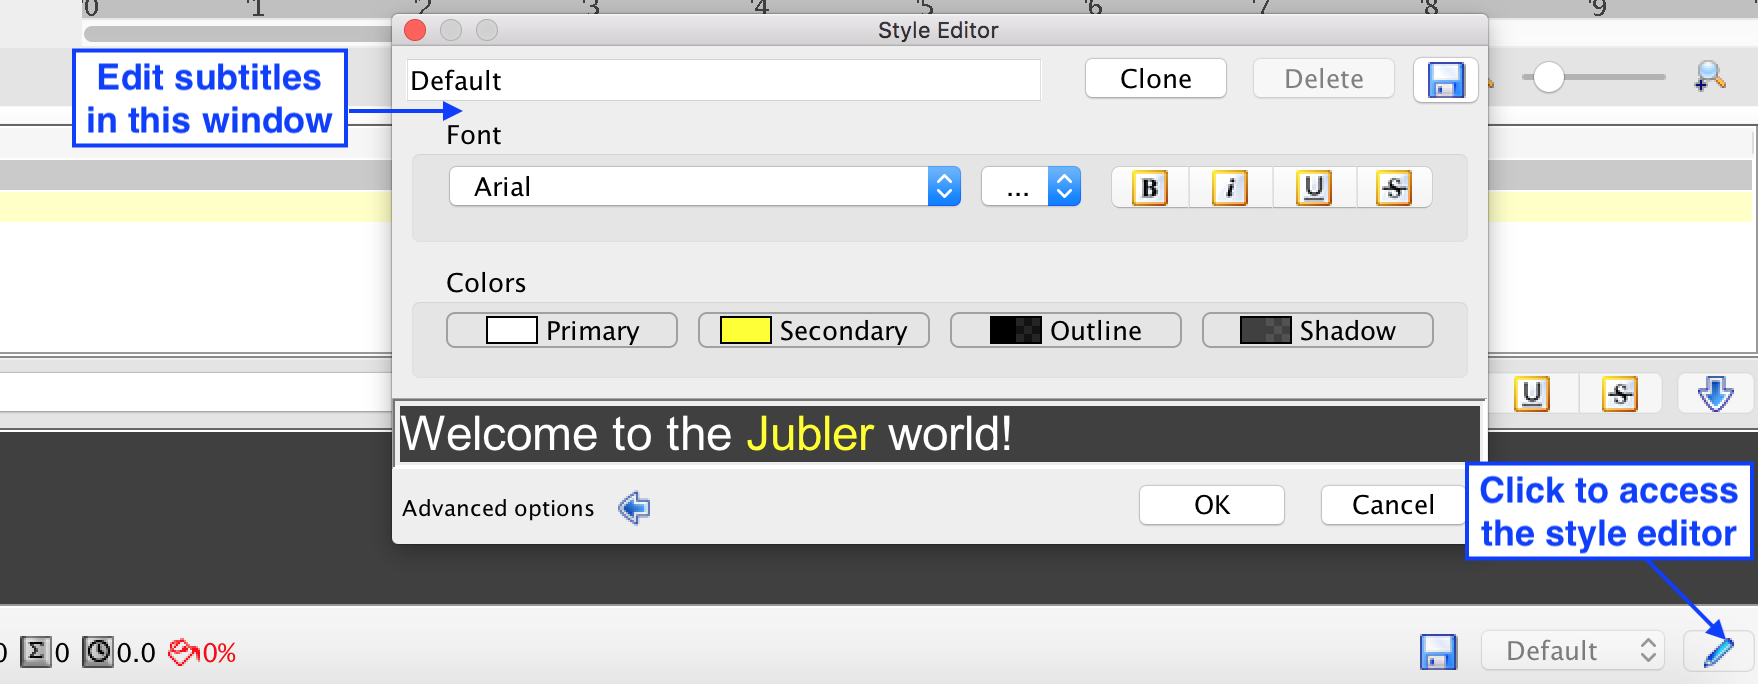
- Click the pencil
 button .
 - The Style Editor window will appear.
- Click on Advanced Options to see options for changing the borders around the text and where they appear on the screen.
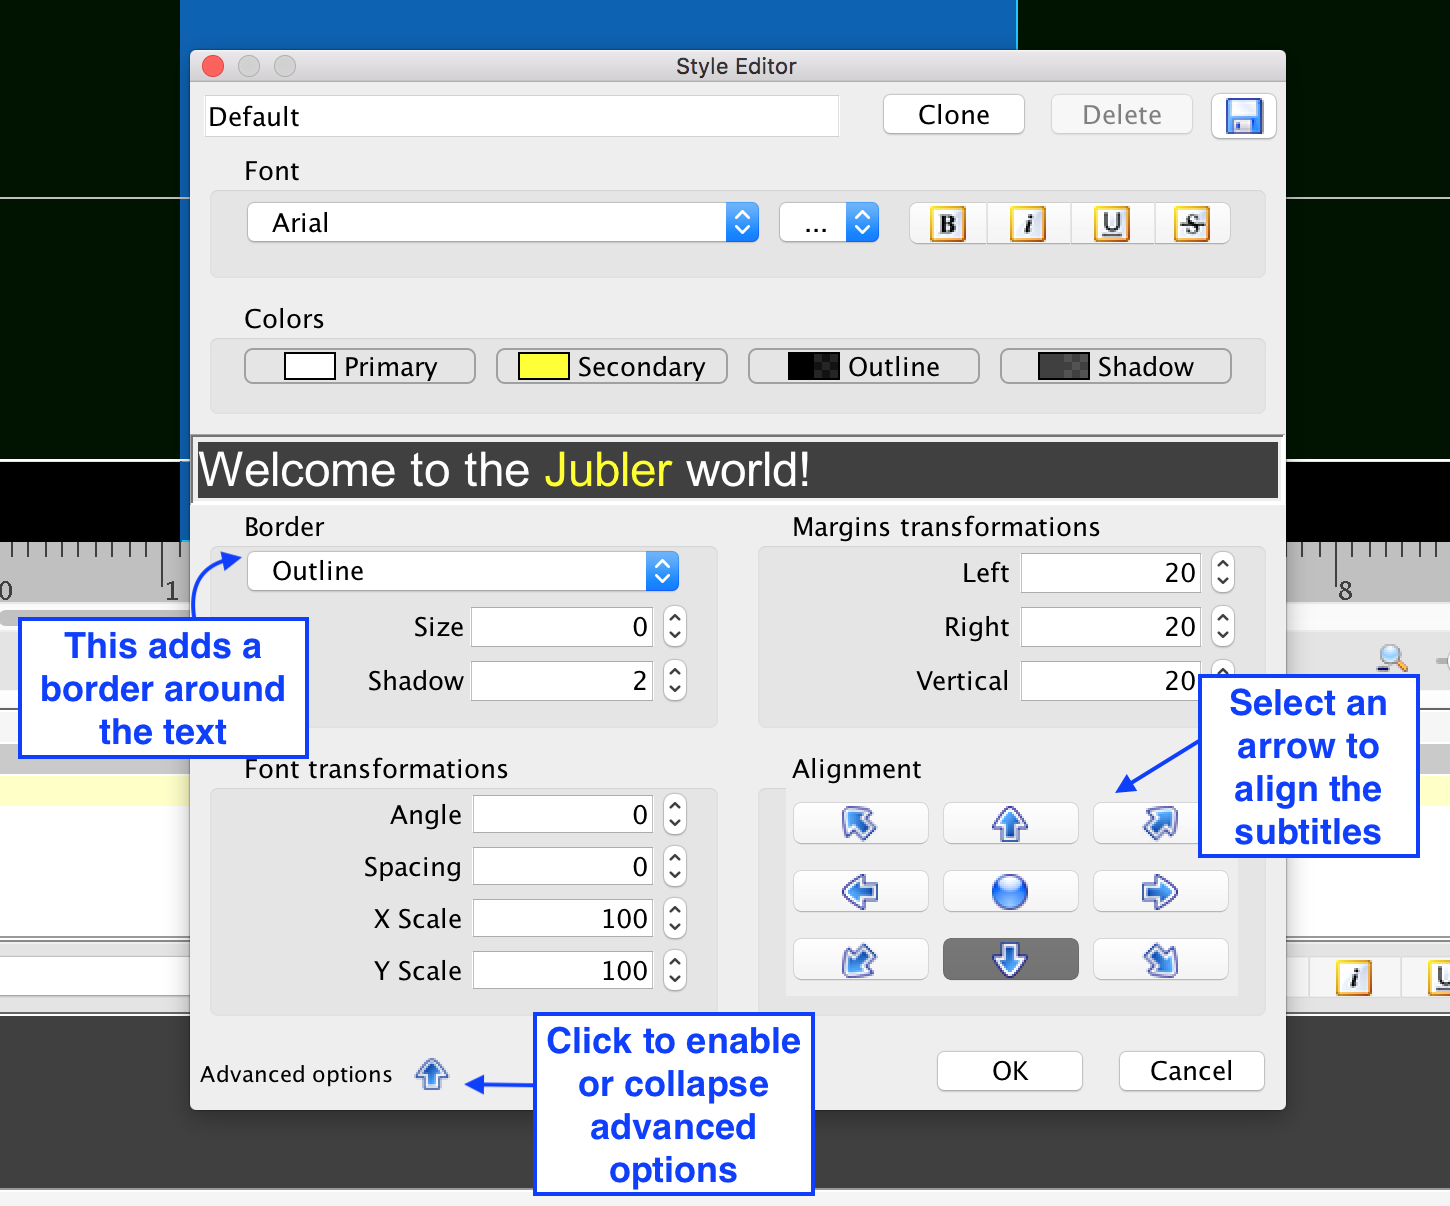
4. Click OK to confirm any changes.
Note: In the Style Editor, you can find formatting functions similar to other word-processing software, such as adjusting margins and adjusting font (size, colour, style, etc.). However, there are some Jubler functions that may be unfamiliar, and are documented below:
Changing the Alignment of Subtitles
You can change the alignment of subtitles for a single line of subtitles or for multiple subtitle lines.
For a single line:
- Click on the Alignment
 button in the subtitle editor.
 - A small pop-up window with different arrows will appear.
- Click the top right arrow and click OK.
- The subtitle now appears in the top right corner of the video

For multiple lines:
- Click on Advanced options, and select an arrow from the Alignment section of the Style Editor.
- Press OK. The change has now been made across all subtitle lines.
Adding a Border Around the Text
- In the Style Editor, under Border, use the arrows to select either Outline or Opaque Box from the drop-down menu.
- Use the arrows to increase or decrease the size of the border, or type in a corresponding size number in the text field.
- Use the arrows to increase or decrease the shadow of the border, or type in a corresponding number in the text field.
- Press OK. The border of your text will now be altered depending on your specifications.
Formatting Subtitle Lines
Under the Edit and Tools menu, you can find formatting functions similar to other word-processing software, like deleting, selecting, inserting, undo, find and replace, etc. However, there are some functions that may be unfamiliar, and are documented below.
Joining Subtitles
- Select the subtitles you’d like to join. To select multiple subtitles lines, hold down the Shift key.
- Click on the Tools menu at the top of the interface, and then select Join Entries.
- In the pop-up window that appears, choose By User Selection.
- Click on OK.
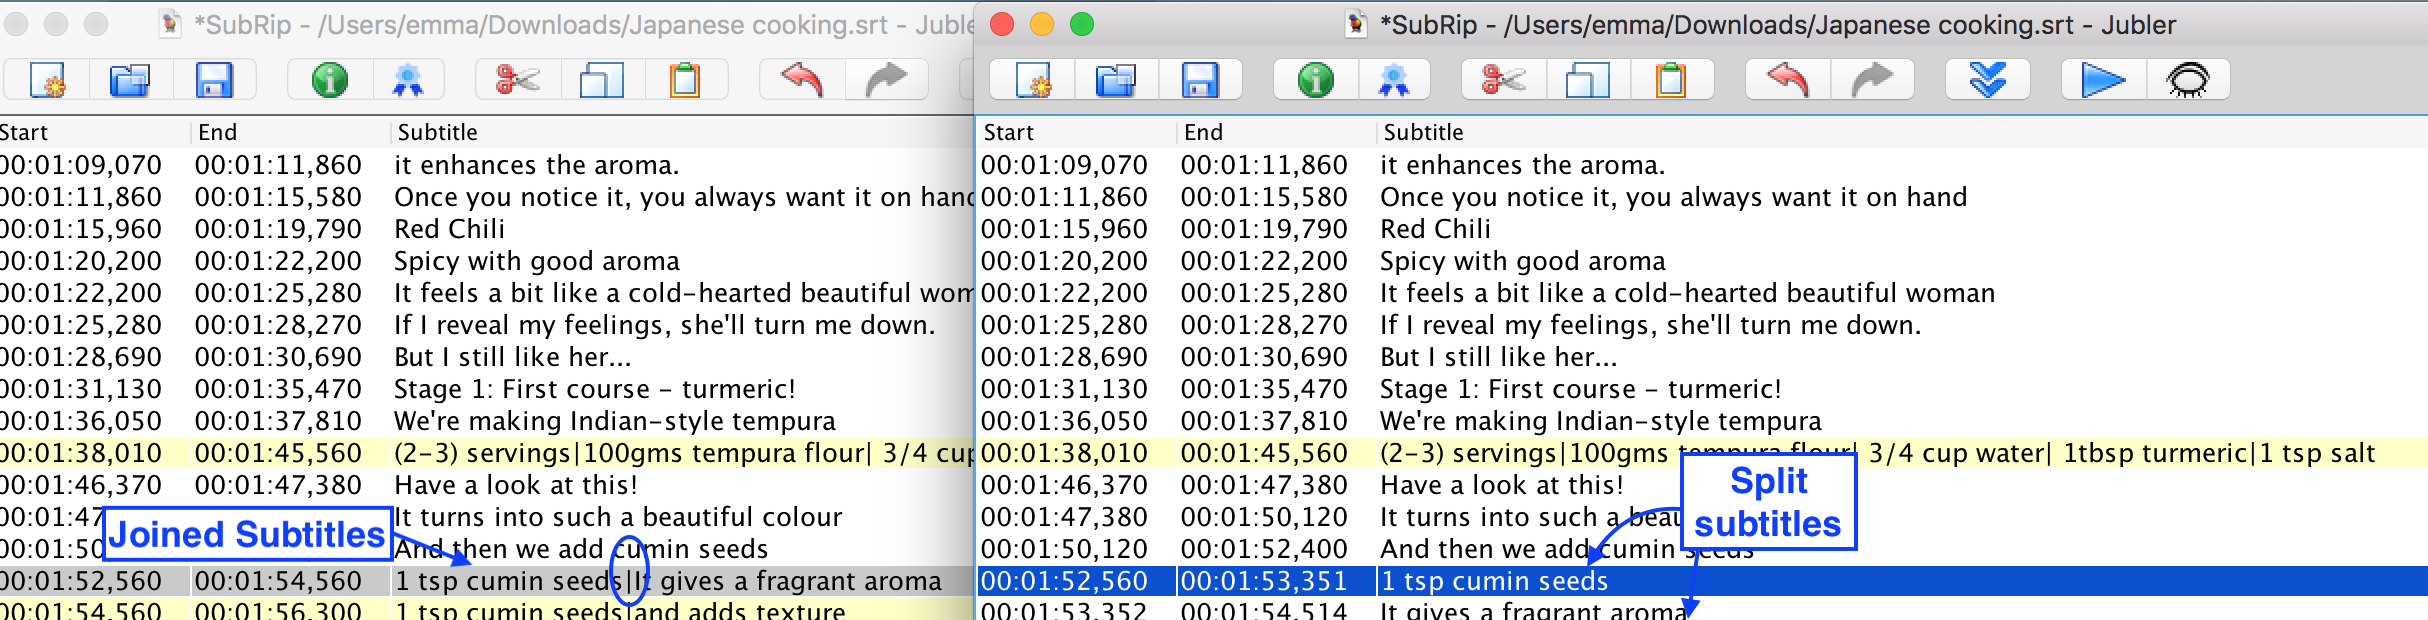
- The selected subtitles will be joined with a vertical line in between the two lines.
Subtitles can be selected either by selecting the lines yourself, or by specifying the time range. When you select the latter option, you simply input the start and end times of the subtitles you’d like to join.
Splitting Subtitles
Only subtitles that have been joined can be split (joined subtitles will have a vertical line to indicate where the subtitles were joined).
- Select the subtitles you want to split.
- Click on the Tools menu at the top of the interface, and then select the Split Entries button.
- In the pop-up window that appears, select By User Selection.
- Click OK. The subtitles are now split.
Subtitles can be selected either by selecting the lines yourself, or by specifying the time range.
Copy and Pasting Subtitles to a Specific Time
If you have a blank line that you want to paste a subtitle into:
- Click on the subtitle line you want to copy or cut.
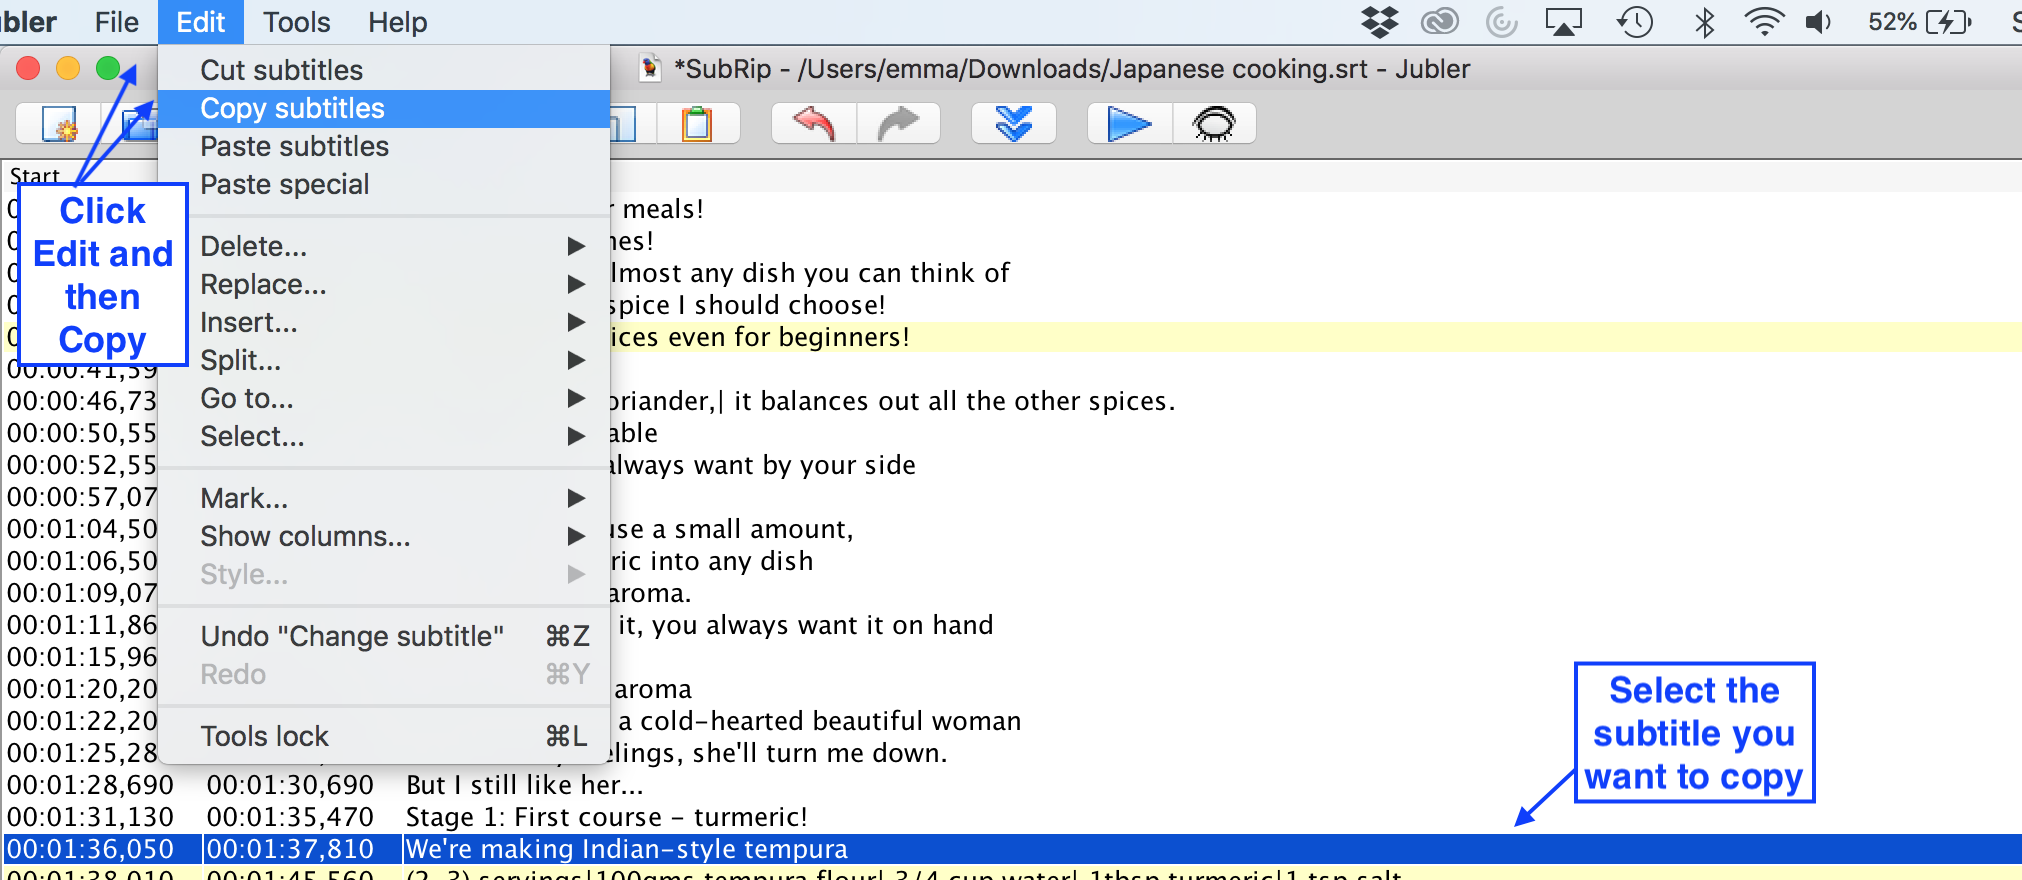
3. Click on where you’d like to insert the copied subtitle.
4. Click on the Edit menu at the top of the interface, and then click Paste Special.
5. A pop-up window will ask you to confirm the time when you want to paste the subtitles in.
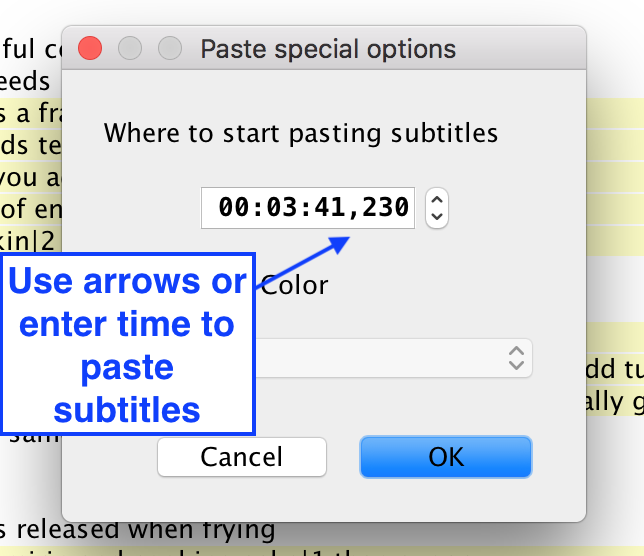
6. Click OK to confirm.
7. The subtitle is now pasted at the chosen time.
Up next:
Synchronizing Subtitles
